Desserts
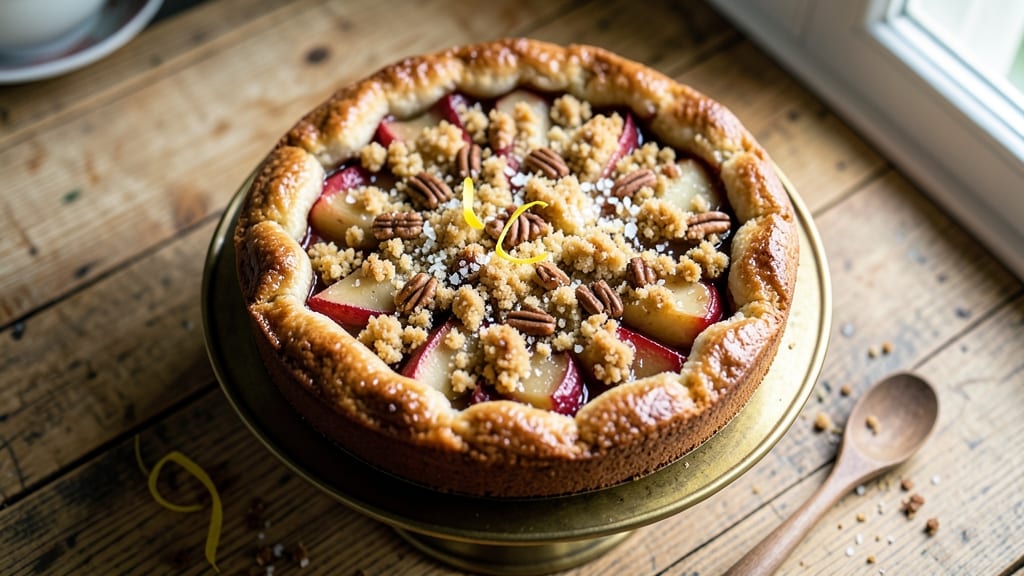
This apple pie cake recipe from scratch delivers the nostalgic comfort of classic apple pie with the convenience of a cake—lattice crust, spiced filling, and all.
The secret lies in a perfectly balanced crust that stays tender yet crisp, while the filling achieves that ideal mix of tender apples and warm cinnamon notes. I've perfected this recipe over years of baking, ensuring every slice tastes like a homemade masterpiece without the fuss of a full pie.
The magic begins with a homemade lattice crust that creates beautiful patterns while maintaining structure. This isn't your average cake crust—it's designed to hold its shape during baking while still offering that pie-like texture.
The spiced filling combines tart apples with a blend of cinnamon, nutmeg, and brown sugar, creating a flavor profile that's both familiar and elevated. What makes this recipe truly special is how the layers interact: the crust stays moist, the apples stay tender, and the spices infuse perfectly.
By the time it emerges from the oven, you'll have a cake that looks stunning with its intricate lattice design and smells like a warm autumn afternoon. Each slice offers the perfect balance of textures—tender cake, crisp lattice edges, and juicy apple filling—all in one bite.
The best part? It's foolproof for home bakers, requiring no special equipment beyond a standard cake pan and a little patience for layering.
Serve it warm with a scoop of vanilla ice cream or a drizzle of caramel sauce for the ultimate dessert experience. This apple pie cake is perfect for holidays, family gatherings, or even a cozy weekend treat. Let's get started on creating your own homemade masterpiece.
Ingredients for apple pie cake recipe from scratch
Fifteen simple ingredients transform into a showstopping apple pie cake with perfect lattice crust.
| Ingredient | Amount | Notes |
|---|---|---|
| All-Purpose Flour 🌾 | 3 cups | Sifted for light texture |
| Granulated Sugar 🍚 | 1 ½ cups | White or light brown |
| Unsalted Butter 🧈 | 1 ½ cups | Cold, cubed for crust |
| Large Eggs 🥚 | 2 whole | Room temperature |
| Vanilla Extract 🍯 | 1 tbsp | Pure vanilla preferred |
| Granny Smith Apples 🍎 | 4 medium | Peeled, sliced 1/4-inch thick |
| Ground Cinnamon 🌿 | 2 tbsp | Freshly ground preferred |
| Ground Nutmeg 🌶️ | ½ tsp | Freshly grated for warmth |
| Light Brown Sugar 🍚 | ½ cup | Packed for filling |
| Lemon Juice 🍋 | 1 tbsp | Freshly squeezed |
| Salt 🧂 | ½ tsp | Kosher or sea salt |
| Baking Powder 🌾 | 1 ½ tsp | Double-acting preferred |
| Milk 🥛 | ½ cup | Room temperature |
| Cornstarch 🌾 | 1 tbsp | For apple filling |
| Vanilla Bean Seeds 🍯 | 1 tsp | Scraped from 1 bean |
The apples are non-negotiable—Granny Smiths give that perfect tartness, but Honeycrisp or Fuji work too. Trader Joe's has the best selection of pre-sliced apples if you're short on time, but I always peel and slice mine myself for that restaurant-quality texture. For the crust, Land O'Lakes unsalted butter is my go-to—it's consistent and reliable. The vanilla? Madagascar bourbon vanilla extract from Williams Sonoma elevates everything, but pure vanilla works too. Pro tip: Chill your butter cubes for 30 minutes before mixing to get that flaky, pie-like crust.
No vanilla bean? Double the extract—it's a game-changer. Running low on brown sugar? White sugar plus 1 tsp molasses mimics the flavor. The cornstarch is optional but helps thicken the filling beautifully. For the lattice, I use parchment paper templates from Amazon—they make the whole process foolproof. Freshly ground spices make all the difference here, so if you've got whole spices, toast and grind them right before using. And if you're worried about the apples browning? Toss them with the lemon juice right away—keeps them bright and fresh-tasting.
This cake keeps beautifully for 4 days in an airtight container at room temperature, though it's best enjoyed fresh. For make-ahead magic, bake the cake a day ahead and store it wrapped tightly. The lattice stays crisp for 2 days if you cover it loosely with plastic wrap. Freeze individual slices for up to 3 months—just thaw at room temperature before serving. I always make this for Thanksgiving and Christmas, and it's the first dessert to disappear every time.
Why You'll Love This Recipe
- No Mixer Needed: I swear by this recipe because it’s a one-bowl, two-spoon job—no stand mixer, no fuss. The butter gets creamed with sugar by hand in minutes, and the eggs just fold right in. (Yes, even on a Tuesday night when I’m exhausted.)
- Taste Like Apple Pie: The moment you pull it out of the oven, that buttery crust smell hits you—like a warm hug from your grandma’s kitchen. The vanilla extract deepens the apple flavor, and the sugar caramelizes just enough to give it that just-baked magic.
- Weeknight or Celebration: This cake is my secret weapon for both lazy Fridays and birthday parties. Serve it plain for a cozy breakfast or dress it up with whipped cream for a dessert that feels fancy. (Honestly, my kids ask for it at school events, and I take it as a win.)
- Leftovers That Last: One batch feeds a crowd, and the slices stay moist for days. I’ve reheated them in the microwave for breakfast or packed them for lunch—no one ever complains. Plus, the butter and sugar are pantry staples, so it’s a budget-friendly treat that always delivers.
Step-by-step instructions for apple pie cake from scratch
This hybrid dessert combines the best of both worlds—tender cake layers and spiced apple filling, all made with your hands.
Make the Lattice Crust Dough
In a large bowl, whisk together the 3 cups all-purpose flour, 1.5 cups granulated sugar, 1.5 tsp baking powder, and 0.5 tsp salt. Cut in the 1.5 cups cold, cubed unsalted butter using a pastry cutter or your fingers until the mixture resembles coarse crumbs with pea-sized butter pieces remaining.
Add the 2 whole large eggs, 1 tbsp vanilla extract, and 0.5 cup milk, mixing just until combined. The dough will be sticky but should hold together when pressed. Divide it into two equal portions and flatten each into a 10-inch circle on parchment-lined baking sheets. Chill in the refrigerator for 30 minutes while you prepare the filling.
Prepare the Spiced Apple Filling
Peel and slice the 4 medium Granny Smith apples into ¼-inch thick slices. Toss them in a large bowl with the 0.5 cup light brown sugar, 2 tbsp ground cinnamon, 0.5 tsp ground nutmeg, 1 tbsp lemon juice, 1 tbsp cornstarch, and 1 tsp vanilla bean seeds. Mix gently to coat evenly. Let the mixture sit for 10 minutes while you preheat the oven.
Preheat your oven to 375°F. This temperature ensures the apples soften perfectly without turning mushy. The cornstarch helps thicken the filling naturally as it cooks, while the lemon juice brightens the tart apples.
Assemble the Cake Layers
Remove one chilled dough circle from the refrigerator and place it in a 9-inch round cake pan (greased and floured). Spread half of the apple filling evenly over the crust. Repeat with the second dough circle and remaining filling, pressing gently to create a sealed center. Use a fork to cut a simple lattice pattern on top of the second crust, creating a beautiful design while keeping the filling contained.
Bake for 45-50 minutes until the crust is golden brown and the filling bubbles slightly at the edges. A toothpick inserted into the center should come out clean. The lattice pattern will crisp up beautifully during baking, giving you that perfect pie-cake texture.
Finish and Serve
Let the cake cool in the pan for 15 minutes, then transfer it to a wire rack to cool completely. The warm filling will continue to set as it cools, creating that perfect balance between cake and pie textures. Serve slices at room temperature for the best experience—each bite delivers tender cake, warm spiced apples, and a hint of vanilla.
For extra flair, dust the top with powdered sugar or drizzle with caramel sauce. This cake keeps well for 3 days at room temperature or can be frozen for up to 2 months for a comforting dessert anytime you crave something homemade and special.
Pro Tips For Making Apple Pie Cake Recipe From Scratch
- CREAM THE BUTTER SLOWLY: Mix your butter and sugar at medium speed for 2–3 minutes until it’s light and fluffy—not just combined. I used to rush this, and the final cake always tasted dense. The air whipped into the butter is what makes it tender.
- USE COLD BUTTER ONLY: Take the butter straight from the fridge (or let it sit in the freezer for 10 minutes). Cold butter creates pockets of fat that melt into steam during baking, giving you that signature flaky, moist crumb. Warm butter? You’ll end up with a cake that’s more like a brick.
- DON’T OVERMIX THE BATTER: Stop folding in the dry ingredients as soon as they’re just incorporated—no streaks of flour left. Overmixing develops gluten, which makes the cake tough. Think "gentle but thorough," not "beat it into submission."
- BAKE UNTIL THE CENTER HITS 205°F: Use an instant-read thermometer to check the middle—it should register 205°F (210°F if you’re using a wire rack). The cake pulls away from the pan but still jiggles slightly. Cutting it too soon? You’ll get a gummy mess. (Yes, even if it looks done.)
Troubleshooting this recipe
Crust Too Dry?
If your lattice crust turns out dry or crumbly, it’s likely from overmixing or using warm butter. I’ve found that cold butter (straight from the fridge) and mixing just until combined keeps the texture tender. Also, ensure your baking powder is fresh—old leavening agent can make the crust dense.
For extra moisture, brush the baked crust with a simple egg wash (1 egg + 1 tbsp milk) before serving. 🌾
Filling Too Watery
The apple filling may release excess liquid if the apples weren’t prepped properly. Always toss sliced apples with lemon juice immediately after cutting to prevent browning, which can make the filling watery.
For extra thickening, add 1 extra tablespoon of cornstarch or let the filling sit for 15 minutes before baking to draw out excess moisture. A splash of apple cider (2 tbsp) can also help balance the texture. 🍎
Cake Sinking Mid-Bake
If your cake collapses or sinks in the middle, it’s usually due to overfilling or underbaked layers. Measure your filling carefully—it should be evenly spread without overcrowding the pan. For stability, bake the cake for 5 minutes before adding the second crust layer.
If using a 9-inch pan, reduce oven temp to 350°F for the first 10 minutes to set the bottom layer properly. 🔥
Lattice Won’t Hold
Weak lattice patterns often happen when the dough isn’t chilled long enough or the cuts aren’t deep enough. Press the dough circles firmly into the pan to create a solid base, then chill for 30 minutes before cutting the lattice.
Use a sharp knife or pizza cutter to make clean, ¼-inch deep cuts—this ensures the strips stay intact during baking. A light spray of water on the cuts before baking can also help them crisp up better. ✨
Apples Stay Hard
Undercooked apples are usually a sign of overcrowding or insufficient baking time. Make sure your oven is fully preheated to 375°F and bake for the full 45-50 minutes. For even cooking, arrange apple slices cut-side down in the filling layer.
If your oven runs hot, tent the cake with foil after 30 minutes to prevent over-browning while the center finishes cooking. 🌡️
Filling Leaks Out
If the spiced filling escapes during baking, your crust layers likely weren’t sealed properly. Press the edges of the dough circles firmly together around the filling to create a tight seal. For extra insurance, use a pastry brush to lightly coat the inner edges with egg wash before assembling.
If you notice filling oozing during the first 20 minutes, cover the cake with foil and bake until the edges set, then uncover to finish. 🛡️
Nutrition facts
Frequently asked questions
Can I use a different type of apple for this recipe?
While Granny Smith apples give the best tartness, you can use Honeycrisp, Fuji, or Pink Lady for a sweeter profile. Avoid overly soft varieties like McIntosh—they'll turn mushy when baked. For extra flavor, mix two types like Granny Smith and Honeycrisp for a balanced sweet-tart experience.
How do I make this recipe gluten-free?
Replace the all-purpose flour with a 1:1 gluten-free flour blend (like Bob's Red Mill) plus ½ tsp xanthan gum. For the crust, use 1.5 cups gluten-free flour and reduce the milk to ¼ cup to prevent dryness. The lattice technique works the same, but gluten-free dough is more delicate—chill it 45 minutes instead of 30.
Can I make this cake ahead of time?
Yes! Bake it 1 day ahead and store it in an airtight container at room temperature. The lattice stays crisp for 2 days if covered loosely with plastic wrap. For longer storage, freeze individual slices for up to 3 months—thaw at room temperature before serving. The flavors actually improve overnight!
What's the secret to perfect lattice crust?
Chill the dough for 30 minutes before cutting, and use a sharp knife or pizza cutter for clean ¼-inch deep cuts. Weave the strips in a herringbone pattern for extra stability. Brush the cuts with water before baking to help them crisp. The key is patience—don't rush the chilling or cutting!
Can I add nuts or oats to the filling?
Fold in ½ cup toasted walnuts or pecans for crunch, or sprinkle ¼ cup rolled oats into the filling for texture. Toast the nuts first in a dry pan for 3-5 minutes to enhance their flavor. For extra richness, add 1 tbsp melted butter when mixing the filling.